
Ever since we were juried into the Manchester Art Show, we have had a lot of chores to attend to and juggle to get everything ready for the show. That meant being off the computer/internet. When we checked the other morning, we had nearly 700 spam emails in our spam folder. So, we have been gone off the blog for a long time. We have inventoried what we are going to show. Ordered some metal prints to see how they go over and have our greeting cards done as well. We only have our coaster tiles left to make.
Molly and I have had several gallery showings and the images have always been hung by the gallery. This is an outdoor show in a 10 x 10 tent. Any walls to hang images on had to be fabricated. We did research into metal grid walls,fabric walls and other commercial methods of hanging our art. Each was expensive and being ‘frugal’, we just couldn’t see spending the money.
That left making our own. Lots of research led us to modifying what are called ‘stage flats’. As you can see from the pictures below, we developed a wooden frame with a vertical and a horizontal cross members. They were originally designed to have tables set in front but I made a mistake in thinking tables are 30 inches in height— they are 29 inches so that means I wasn’t going to be able to use tables to help stabilize the walls with bracing running from the walls to the undersides of the tables. So, we developed bolt through fastening with bolts, washers and wing nuts. Essentially, we need no tools to erect them.
Building them to utilize a corner wall designed to keep everything stabilized allows us to get away with out using jack wall supports. Also they are 7 feet tall which is the height of the structural supports of a craft tent which means we can always tie them off to the tent itself. Final dimensions are 9.5 feet wide at the rear wall and 10 feet on the two legs of the U. Each panel has its own identifier to assist in setting them up in order.
The walls are 7 feet tall by 30 inches wide ( designed to give lots of white space for a 20 x 24 frame/16 x 20 matted and framed image). They are ‘skinned’ with black out cloth fabric obtained from WalMart since it was cheaper than using cheap plywood and painting. One of the benefits of using the fabric is weight. Molly can handle these with no problems and they fit in the bed of a pick up. We used 1 x 4 (3/4 x 3.5 inches) so we would not need back bracing etc.
We will be using two tables– one that is 8 feet wide for displaying Molly’s 8 x 10 images that aren’t on one of the special corner walls. This table sits at the back wall.The other is a 4 foot that will have the Square Reader and the greeting cards/tiles.
When you start out thinking 10 x 10 is a large space and then do scaled drawings to see how everything will fit and still leave enough room for people to enter and look at your stuff without feeling trapped– you realize that 10 x 10 is not really that big.
If you are in the neighborhood next weekend– drop by and see us. If you can’t make it– wish us well and I will try and take a picture of our set up.
For larger image click
-
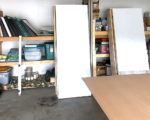
- Display wall- skinned and ready
-
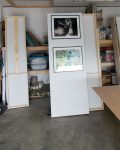
- Display wall with images